Friday, October 17, 2014

Brioche Chic - Book Review and Giveaway!

Mercedes Tarasovich-Clark is practically my best friend. She doesn't know it yet, but she is. 

Why? I'll explain shortly, but first, let's talk about her amazing new book:


First I feel the need to discuss just how easy this book makes brioche knitting. Brioche Chic taught me how to brioche knit in 20 minutes. 

NO KIDDING! 

I should probably back up and say that technically 3 years ago I took a brioche knitting class and while I walked away with a swatch that looked like brioche, I had no idea what I'd just done and had no idea how I'd just done it. I truly had no business being in that classroom as I could barely sort out a right increase from a left, and knew only one cast-on and one bind-off technique. So technically it doesn't count... in my books. 

But this beautiful book had me knitting away happily, feeling like a total rockstar, in 20 minutes. It might have even been 10 minutes. There might have been a glass of wine involved so who is really watching the clock when that happens? AMIRIGHT?

Ok, for serious, I opened the book, had some yarn and needles on hand and just... brioche'd. The begining of the book walks through the Brioche Basics and features the perfect set (in my opinion) of diagrams to accompany the descriptions of how to create the structure of bricohe.

Turn a couple of pages to the Knitting Brioche section and you'll find directions for working one-color brioche rib. In the flat AND in the round. 

So I did. And after brioche knitting 5 rows or so I felt ready to tackle increases. And then more increases. And then DECREASES! It was so exciting. I did all of this while I watched the Hubband cook. 

Want proof? 

I cast on 16 sts, worked my setup round and then boom! I was off to the races. 


Obviously my tension needs a bit of work to get the increases and decreases evened out but for my first crack at it, I think the proof is there that this book is worth every penny.

Well, I wasn't satisfied with a one-color swatch anymore. So as I continued through the Brioche Basics portion of the book, I arrived at Two-Color Brioche. And not just two-color brioche but two- color brioche with CABLES (technically faux-cables but for realsies - it's so cool). I decided to try my hand at that. 

And while I was at it, I tried a new-to-me cast-on, the Italian Tubular Cast-On which is also thoughtfully diagramed out in the Cast-Ons and Bind-Offs for Brioche section. Here's what I ended up with:


I had a few mis-steps the first time I tackled this two-color swatch: the first go-round I forgot that I had to brp instead of brk with the second color (read: "I had to burp instead of bark"- *giggle*). The next time, I tried brp'ing and brk'ing on the wrong sides. But the third try I sorted it all out in my head and from there on out was happily knitting along, all the while thinking "I'm a rockstar, I'm a rockstar, look at me goooooo!". Surely you have a knitting mantra? No? Well, you should get one. 

Once I finished these swatches I started to consider HOW to apply brioche to things other than these beautifully squishy, light-as-air swatches. This was such a different feeling from the first time I tried brioche (you know, the time that technically doesn't count?) - I was excited to see how it was applied to modern designs. I think the main reason I felt so differently from my class-that-does-not-count, was because I could see the patterns in the stitches, and how they would work for shaping. Again, I have to chalk all of this up to the Brioche Basics section. And that's only the first chapter of this amazing book. 

I was so inspired by the ease with which I created these swatches after "not really" having tried brioche before that I pored through the rest of the book and started marking off all the projects that I will be making in the near future. In no particular order, here are some of my absolute favorites:

Beautiful in its simplicity and found in the Basic Brioche chapter, this cowl would be divine in just about any colorway and will be a great beginners project. 


This beauty looks like a total "grab and go" sweater to me. Found in the Brioche with a Twist section, it couldn't be more cozy. Featuring a garter stitch foundation, it's dolman style so there's no sleeves to sew on. And the cuffs? Come. On!

Also found in the Bricohe with a Twist section, this sweater has the perfect amount of embellishment to it - the brioche sleeves seam beautifully up the raglan shaping and the little leaf motif on the hip? Perfection! 
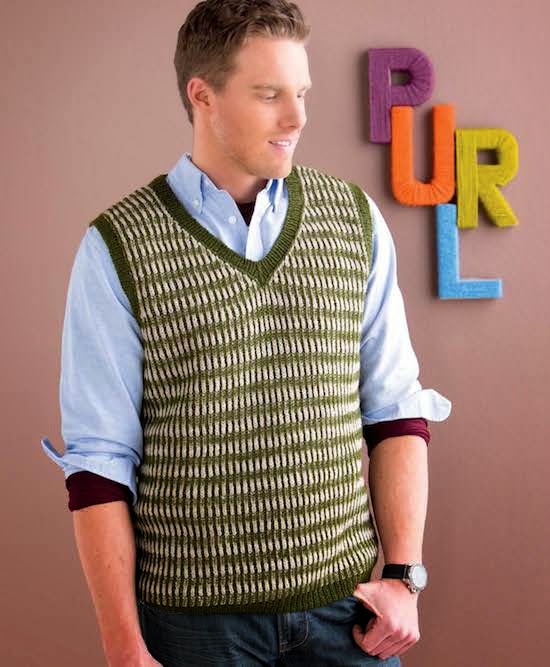
The Hubbs is a total geek for vests and I think he'd look dreamy in this creation. Located in the Colorful Brioche section of the book this vest features a syncopated brioche stripe that looks far more complex than it probably actually is, making it perfectly accessible to any brioche fanatic. 

And last but not least: 
My swatch above looks surprisingly like the colorwork on this beautiful sweater in the Colorful Brioche section - I'm practically done making it already! Or not so much, but a girl can dream!

So what do you think? Are you DYING to get your hands on this book?

I did promise a giveaway. And we're gonna do one. But first I have to talk about why Mercedes and I are besties. Obvi, 'cuz she knits. And is super adorable. And someone once thought I WAS HER!!! 

Total geek out moment: I was at the 2013 Interweave Knitting Lab in San Mateo wearing Mercedes' Emmanuelle Sweater  and as I was walking up the stairs, another young knitter stopped me and was like "Oh my gosh - YOU'RE Mercedes!". 

I think my jaw actually dropped. Little ol' me mistaken for a top-notch designer like Mercedes?! 

Best mistaken-identity moment. Ever. 

Also the Emmanuelle Sweater was my first intarsia work and my first finished sweater that actually fit. So... there ya go. Besties at heart.

But enough about me. 

GIVEAWAY TIME!  This book is amazing and would not only be an excellent Christmas gift for a knitter, it would do wonders on YOUR knitting inspiration shelf. I'm going to give away one copy of this amazing book to one lucky, randomly chosen winner on Thursday, October 23rd!

Since I'm a total Instagram-aholic we're going to base our drawing on Instagram. To enter, visit the Brioche Chic page on Ravelry, snag a screen shot of your favorite design in the book, and post it to Instagram, being sure to tag me, @socalmeaghan, and using #briochechicgiveaway. 

Post your favorite pattern image by 11:59 PST on Wednesday, October 22nd for a chance to be entered. I will announce the winner here on my blog on Thursday, October 23rd.

Please note: this giveaway is limited to U.S. residents only. Once the winner is announced, I will contact you via direct message on Instagram to get your mailing address - please don't post your address publicly! 

If you aren't the lucky winner - you can get your very own copy of this amazing book: Brioche Chic. And what's more? If you're a Kindle user you can get a digital copy of this book too! Who doesn't love an e-book?

Happy knitting! 

Thursday, October 16, 2014

Falling Down MKAL - Prize Announcement

Weeeeeooooo! It's been just 4 short weeks since this MKAL started and there are 3 of you finished already. That's amazing! Four if you count mine... but... well, mine don't really count, now, do they?

Let's take a look at these finished beauties:
Acer Aces from @bcrlmom

Mighty Poplar by @lorriepi

A wonderful colorway (and some winning at yarn-chicken) by @samandramones

And just 'cuz I love 'em - MY socks. This is the Monstera Deliciosa colorway.

But lets get to the main reason we're all here: the PRIZES! Well, hopefully you were initially here for the socks but are NOW here for the prizes!

This time 'round cuz it's a smaller group of KAL'ers I've got only two prizes. Two prizes that aren't from me. I'm kicking in a THIRD prize cuz I love my knitting friends. So let's start there since it's fun to build the suspense. 

So since it's still October and I freaking LOVE Halloween (and the typically-colder weather that comes with it but not in SoCal this year) I'm going to give away a set of my two No Tricks All Treats patterns. These babies: 


If you have already purchased either of these patterns, as I know some of you have (thank you!!!) you can either choose another pattern or two from my store (up to $10 of sales) or you can bank it with me and I'll send you future pattern(s) at your request since I've not updated my store in a bit. It's up to you tho I really do love these patterns!

Next up on the Winners Block is a pattern and yarn combo prize from Ewe Ewe Yarns! The winner will receive a digital copy of the Respectfully Twisted sock pattern and the yarn needed to make the socks! It just so happens that these socks are my design and the first pattern I sold to a company. Double win!


And our third prize is a delightful sock-sized project bag, with fabric inspired by this very MKAL, by the incredibly talented Sixmunchkin Stitching. 

This prize is especially noteworthy because the lovely Lisa of Sixmunchkin Stitching is going to make project bags for the sweater KAL I'm hosting in early 2015! Her bags, which will be themed to match the KAL, will be available for pre-order as an add-on to the kits so save up your pennies. The quality of the bag is astounding so it'll be worth every cent!!! Check out the style of the bag and the quality of the details. I'm in love (and totally jealous of the winner who gets to keep this lovely bag). 


Do you see that? There's a snap to keep your working yarn at hand - AND you can undo it so you don't have to cut your yarn to remove it from the bag. I LOVE IT!


And having had my hands on this bag and photographed, I can tell you that this bag is most definitely made with LOVE. 

So, with all this said and shared, get those socks finished and submit them so you can win these awesome prizes! How, you ask?

Join our group on Ravelry: http://www.ravelry.com/groups/the-unapologetic-knitterTag me on Instagram: http://instagram.com/socalmeaghan and use #fallingdownmkal, #unapologeticknitter and/or #tuksockmkal.

And by all means, if you have questions, email me at meaghan@unapologeticknitter.com or message me on Rav (http://www.ravelry.com/people/SoCalMeaghan), leave a comment here, or leave questions in the Discussion board for the MKAL on Ravelry (http://www.ravelry.com/discuss/the-unapologetic-knitter/3013583/1-25#23). 
**NOTE**
There have been issues with me seeing questions on Ravelry in the past because, despite me being the owner of the discussion board, I don't get notified when people comment; I'm only notified if I'm tagged. So,  if it's urgent, please be sure to ear burn me. 
To do this enter my username in square brackets and follow it by tying the word "person" in parenthesis: 
[socalmeaghan](person)

Lastly, a friendly reminder about our prizes: to be entered to win make sure to submit your photos to me via email, Instagram (being sure to tag @socalmeaghan) or in our Ravelry MKAL discussion NO LATER than 11:59pm PST on Thursday, October 30th.


Happy Knitting!!!


Thursday, October 9, 2014

Falling Down MKAL - Week 3 - End of Foot & Toes

Let's check out some HEELS! I'm loving how excited you are about the heels. One of you is so excited you managed to get BOTH feet into the socks that are stuck together. I LOVE it!

Photo caveat: just because your photos aren't up here, doesn't mean you aren't doing a killer job. I just click on the #fallingdownmkal on Instagram and choose the first few that pop up!

Front and back of some lovely heels from @bcrlmom

Look at those blocks fall away on @christelleb78's socks

And the intrepid (and death-defying) @samandramones getting right into her socks!

It's so good to see folks surviving the 2aat gusset heels. The first time I tried them I *might* have used a few bad words and thrown the lot across the room. Might... not saying it actually happend but it miiiiiiight have. 

So this week we're going to finish the feet and the toes and well... the socks! It should be way less crazy than the heels. Finishing off the feet is pretty similar to working the legs with the minor difference of working the pattern across the top of the foot only and working in stockinette across the bottom. How much faster is it, right? I love designs and making beautiful patterns but getting to the foot part rocks - I love the simplicity of the sole. 

Anyway, I digress. Let's talk a bit about how to plan for the toe decreases. In the week 1 clue release on the last page I talked about how long to make your foot from the back of the heel to the tip of the toe. This is where that math now comes into play. I'm going to use MY numbers as examples but let's look at how to best work the rest of your foot and your toe decreases. 

My foot is 9" long from the tippy tip of my big toe (cuz my second toe is actually shorter than my long toe - I know this isn't the case for everyone so take the measurement from the longest digit) to the back of my heel. I like a 10% negative ease on the length of my foot so that the sock still fits nice and snug at the end of the day. So at 8.1" (90% of 9") and my row gauge of 42.5 sts / 4" I need 86 rows for the sole of my foot. 

NOTE: I do NOT count the bind off of the toes in this measurement. 

So, since we start the heel on row 71, I count that as Row 1 of my foot row counts. And since I was very nice when designing this sock, I made each pattern repeat 10 rows. As a result, counting my completed rows of foot length is super easy. 

But - if you weren't working this pattern and you wanted to count your rows, here's a little trick I like to use. I place a marker after each 10 rows completed so that I just have to count the markers up. Also - feel free to poke fun at the fact that I'm completely obsessed with alternating my markers. Always. I dunno why. 


Getting back to the maths for the foot: my overall row count is 86. Knowing that, I need to look at how many rows of decreases I'm going to do for my toe shaping. So here's a little bit of math for YOU to do for yourself (again - substitute your numbers here):

Overall foot row requirement: 86 rows
Overall foot st count: 56 sts (28 sts on front needle and 28 sts on back needles)
Desired finished toe width: 1.5" (which works out to 12 sts on each needle based on my stitch gauge)

28 sts minus 12 sts = 16 sts
Working the toe shaping per the pattern I know it will therefore take me 16 rows to complete my decreases.

86 rows total desired minus 16 rows for the decrease = 70 rows of foot before starting the decreases.

Lucky for me (truly... I PROMISE I didn't plan this) my even knitting ends on an even row. If that were not the case, I would have the choice of continuing to knit in pattern right up to the point where I need to start decreasing, or I could work in pattern to the last 10 repeat and then knit even in stockinette until I need to start decreasing. The choice is yours. 

So now you've sorted out your decreases, you've WORKED the decreases and now you have to work the Kitchener Stitch. Let's get our yarn cut and find our tapestry needle. I usually leave about 10 inches of working yarn for the Kitchener finish.


Folks don't seem to like the Kitchener Stitch. If you're one of those who LOVES it like me - welcome to the club, new bestie! 

I think the reason folks have trouble with the Kitchener is they don't see the pattern in it. At least that's what I'm guessing. I'm not sure why otherwise. But basically what I always remember is that each stitch has to be worked twice - once knitwise and once purlwise and the "bind off", aka: the direction by which you remove the stitch from the marker can be chalked up to whether it's "Right" of "Wrong".

Say what?

Stay with me on this. 

When you're working in stockinette, there's a Right Side and a Wrong Side. The Right Side is when the "V's" are facing you, the Wrong Side is when the worms are facing you (yes, I call the back side of stockinette "worms" - I think that's what they look like). 

When you're removing the stitch from the front needle, with the RIGHT SIDE facing you, you're going to remove the stitch knitwise (which is conveniently the side of the fabric that is facing you when you would be working a knit stitch). 

Conversely, when you're removing the stitch from the back needle, the WRONG SIDE of the inside of the sock is "facing" you. I know, it's kind of a loose theory since you're not necessarily looking into the sock but I think you know what I mean. So in this case, you'd remove the stitch purlwise since you're looking at the wrong side of the work. 

Clear as mud?

If not, that's not unexpected. I've watchted the following video about a dozen times in the past. Thankfully I now know how to Kitchener without it, but one last time I'm going to refer you to the guru, Knit Purl Hunter, and her awesome Kitchener tutorial:


Also - did you notice she says knit WAYS and purl WAYS instead of WISE? Have I been saying it wrong all this time?! Now I doubt myself. 

One more thing before I let you go for the week. Let's talk about sock blocking. Some folks use Sock Blockers. I am not one of those people. Why? 'Cuz I figure socks are socks, right?! Do they really need to be shaped to a foot? Some folks love them. I have no personal disdain for them - I just haven't bothered investing in one. 

Does that mean I don't block my socks?! HECK NO! I always block my socks. But it's a simple process for me. 

I grab a bowl, my SOAK Wool Wash (my favorite smell is Yuzu), my socks, and some cool water. 


I squeeze about a teaspoon of soak onto my socks and then run the water over them until it's all nice and foamy and good smelling.

Then I walk away for about two hours 'cuz I forget the socks are there in the water. 


When I finally remember about them I run back upstairs, squeeze out all the water (you don't need to rinse them of any leftover suds) and then simply lay them out on a blocking mat.


And that will about do it! If you're like me and you block under a fan, you'll have new socks to wear in about 8 hours. GO YOU!

Can you believe we've knit socks in 3 weeks?! WOW! Way to go all of you. I'm so honored to have had the chance to knit with you, and I look forward to the chance to do it again (think "Sweater"... it's gonna happen in early 2015). 

And don't worry - I haven't forgotten about the prizes. We've got some coming your way - I think I'll post them NEXT Thursday so I can share some more photos of your excellent work. Speaking of photos, keep sharing them! Please! I love to see your progress!

Tag me on Instagram: http://instagram.com/socalmeaghan and use #fallingdownmkal, #unapologeticknitter and/or #tuksockmkal

And by all means, if you have questions, email me at meaghan@unapologeticknitter.com or message me on Rav (http://www.ravelry.com/people/SoCalMeaghan), leave a comment here, or leave questions in the Discussion board for the MKAL on Ravelry (http://www.ravelry.com/discuss/the-unapologetic-knitter/3013583/1-25#23). 

**NOTE**
There have been issues with me seeing questions on Ravelry in the past because, despite me being the owner of the discussion board, I don't get notified when people comment; I'm only notified if I'm tagged. So,  if it's urgent, please be sure to ear burn me. 

To do this enter my username in square brackets and follow it by tying the word "person" in parenthesis: 
[socalmeaghan](person)

Lastly, a friendly reminder about our prizes: to be entered to win make sure to submit your photos to me via email, Instagram (being sure to tag @socalmeaghan) or in our Ravelry MKAL discussion NO LATER than 11:59pm PST on Thursday, October 30th.

Happy Knitting!!!

Wednesday, October 8, 2014

New Pattern: No Tricks All Treats Fingerless Mitts

They're done! They're done! The matching mitts to the socks I released last week. And I couldn't love them more if I tried.

Ok, that's a lie.

I could love them MORE if I hadn't had to rip out the initial design three times before I was happy with the finished product. But I DO love them. Oh. So. Much.

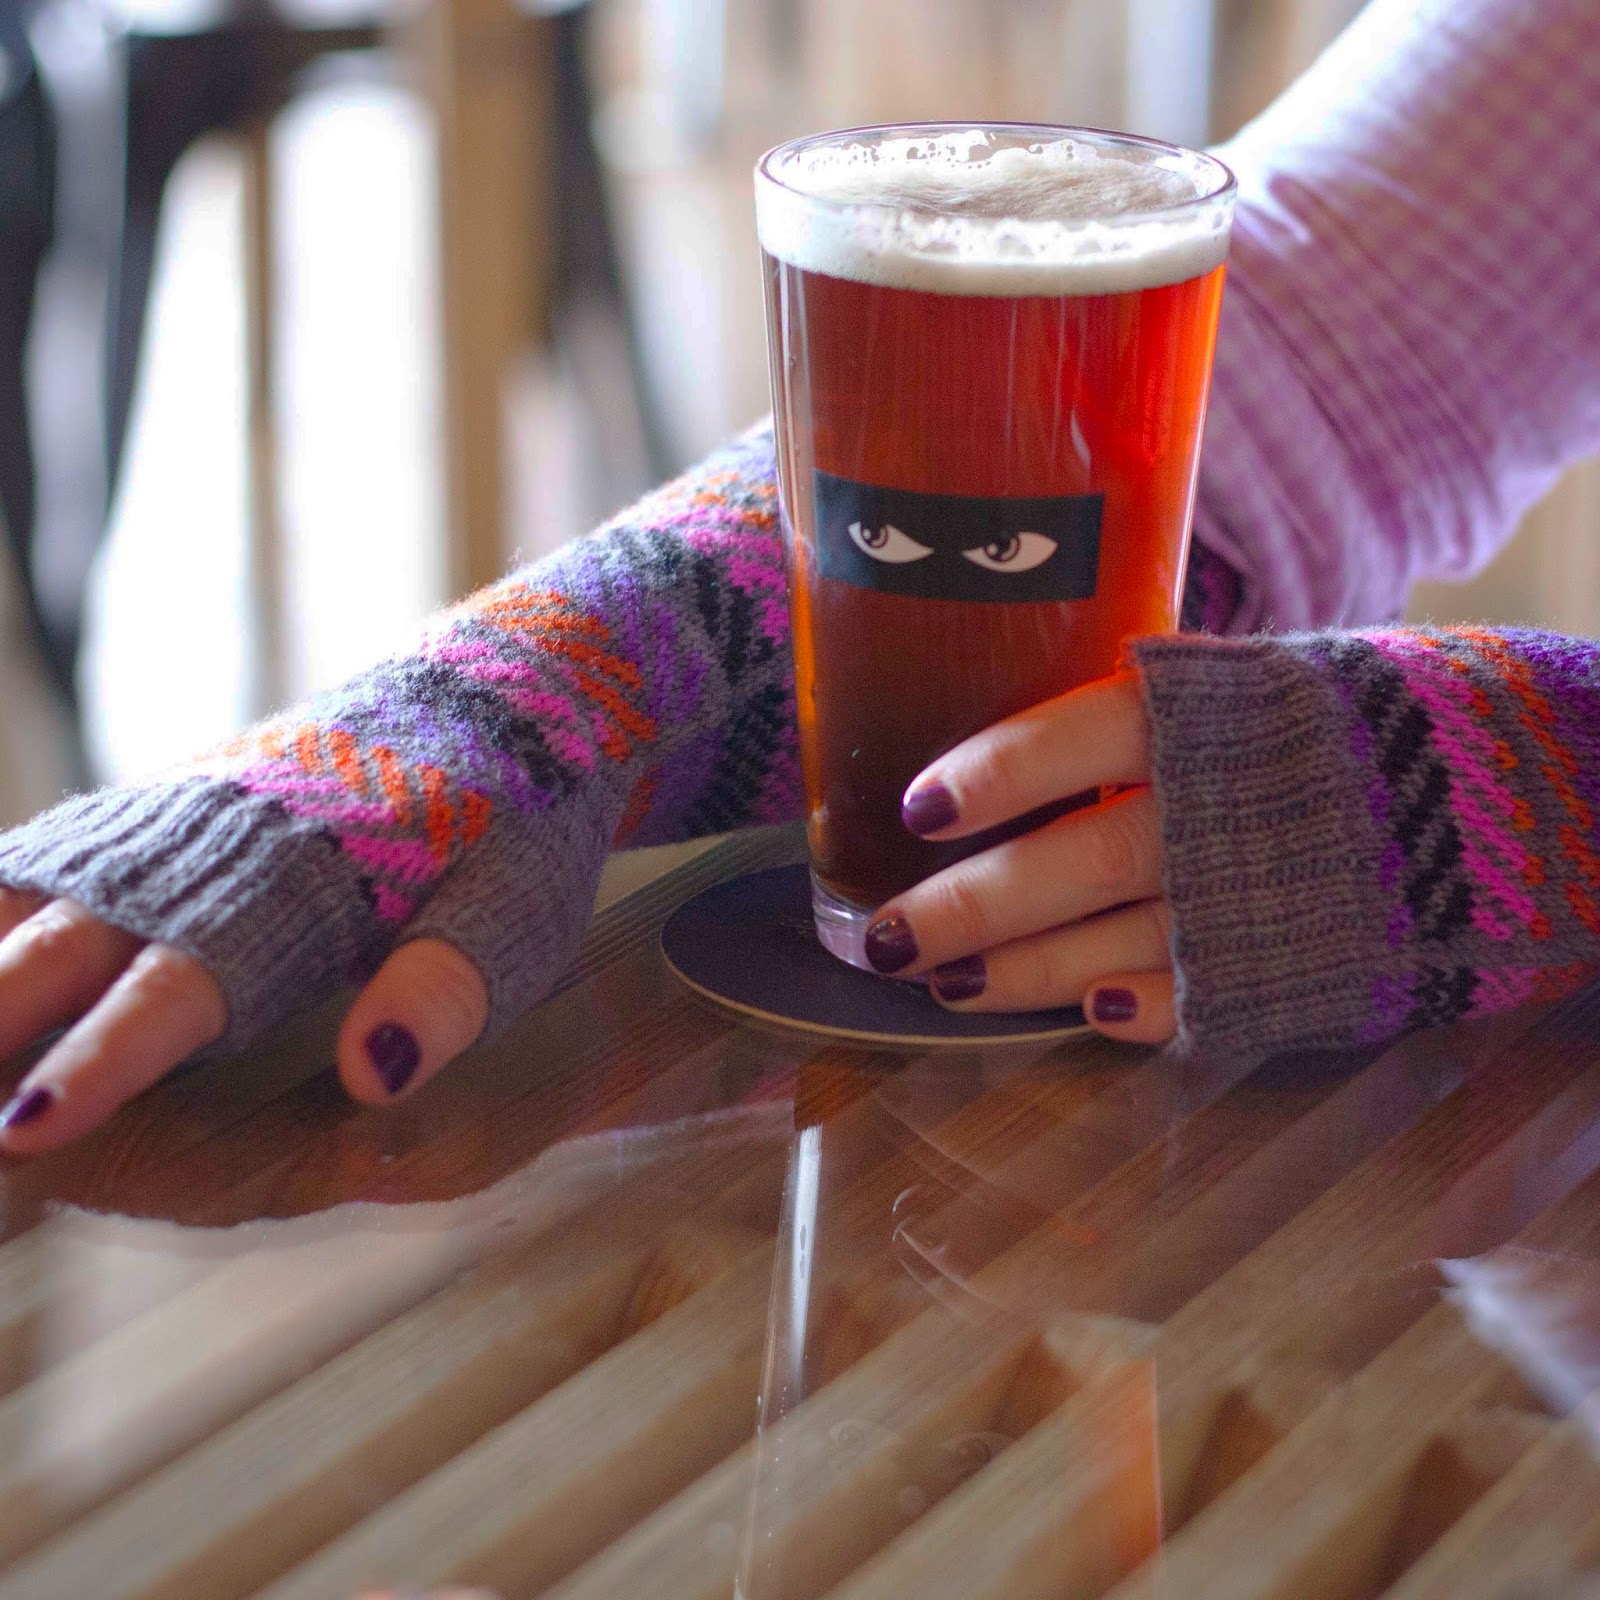
These mitts are loooong... meant to be worn the full length of your forearm to keep you nice and toasty on these chilly fall days. They're fitted to the arm so they fit under sweaters and jackets easily and are mirror images of one another.

And the BEST part (IMO of course)? They're fully reversible so if you want to wear the Chevrons on your palms instead, you can go right ahead.

The mitts feature the Trusty Sock base from Nomadic Yarns in two colorways: a solid, "Smoke, and a self-stripping, "The Slutty Pumpkin". Ashley has a wide range of self striping yarns that would be beautiful in this pattern - go check them out and decide which one makes you happiest. I kind of want to do the "Poolside" - it's amazing!

And guess what? Nomadic Yarns has done up a Dye to Order kit for these patterns so you can order them in combo. Check it out!

**DEAL ALERT**
For the month of October - if you have purchased the No Tricks All Treats Socks, you can use coupon code "NOTRICK50" at check out to receive 50% off your copy of the

OR
If you purchase both patterns together you'll automatically receive 50% off the price of one pattern.


Anyway - here are the mitts... do you love how the Smoke decreases at the elbow mirrors the increases for the thumb? Makes me SOOOOOOOO giddy!


Go make your own - keep your fingers warm when you're drinking your winter beers (and I hope you get a glass as awesome as the one in these photos!). 

Happy knitting, lovelies!!!


Thursday, October 2, 2014

Falling Down MKAL - Week 2 - End of Leg, Heels and Start of Foot

Ok... where did September go? For serious. I can't believe we're already into October - I feel like 2014 just started!

Anyway, all whining about time aside, HOW MUCH FUN did you have making these socks? Was it too much in the first week? I hope not. I tried to take cues from the first MKAL this spring which seemed like the socks were broken down TOO much and folks were antsy for more in one week so I hope I've hit a better balance. Feel free to leave your feelings about this in the comments so I know if you're finding it a better balance of clue in a week.

I DO know that some of you are ROCKING your socks already. Check this out:

Here we've got @bcrlmom using Acer Aces for her socks and making some major strides. 
(what DOES "bcrl" stand for, Gretchen?)

@christelleb78 showing off her amazing gauge... seriously - that ribbing?! Ah. Maze. Ing. 

Mighty Poplar is looking good on the backs of @kznits socks... I love seeing those blocks falling away. 

And last but certainly not least, @sixmunchkinstitching is getting a great start using a lonely skein she had on hand. 

Squee! I just love seeing your socks coming together. It makes me all warm and tingly inside. :) 

Let's get down to some BIZ-NISS about this weeks clue release. The pattern part on the remainder of the leg is pretty clear, right?! Just keep on doing what you've been doing up to this point with the next piece of the chart and you're off to the races. It's this 2aat gusset heel that needs some discussion. 

Let's chat about my choice of heel first. If you've worked the Hermione's Everyday Socks before, this is going to look mighty familiar. It was my first successful gusset heel so I've stuck with it because I think a) it looks awesome and b) it is, in my opinion, one of the easiest gusset heels to work with. The designer called the heel a "Modified Eye of Partridge heel". Here's why:

A standard Eye of Partridge heel looks like this:

The slip 1/ knit 1 pattern runs from end to end of the heel. And, again, IMO, it's REALLY  HARD to pick up those slipped edge stitches. For me. I'm not saying that it's hard in general, I just lose the stitches really easily somehow and end up with the wrong number of stitches. Like, all the time. 

What the modified version of the heel does is create a section, 3 stitches wide, that is pretty much a road map saying "Hey, you, pick up the stitches here, and here, and here..."... You get it. 

Hat's off to Erica Lueder for her awesome modification of this heel that makes Meaghan a happy knitter. 

So you've worked your flap, you've turned the heel so you have your decreased number of stitches on what will be come the bottom of the heel (the very back part where the sock cups the bottom of the back of your heel) and now you have to pick up these stitches. So here we go - my best attempt at a photo tutorial of these tiny stitches. 

Below you can see the 3 st garter panel down each side of the heel flap. 


And here's the heel with the turned stitches on the bottom. 


And here's the count of the garter rows up the side of the flap starting from the leg side (the 14th row of garter is right up against the needle).


To start picking up the stitches to create the gusset:

1) Locate the first bump adjacent to your live heel sts. Put your needle into the first WHOLE stitch, making sure you're picking up both legs of the st, and we're going to pick up and knit a stitch from this stitch. 


2) You're going to repeat this process just above each bump along the side edge of your heel flap until you have the required number of picked up sts. 
3) Now you have to pick up one more to close the gap. Now, let me preface and say that this isn't REQUIRED but I think it closes up any would-be gaps very nicely. See that little "V" between the left leg of the stitch on the heel, and the right leg of the first stitch on the Front needle? Make a stitch using those two legs. Easy peasy, Mac 'n' Cheesy! 


You're going to repeat this process on the 3 remaining sides of your heels. This starts the gusset section and turns the stitches so they're now all running in the same direction as the instep of your sock. 

Now, let's talk about the craziness that is about to ensue when you have all of your heel sts on the back needle. I know... I know. It's totally wacky, right? But it's doable. I've done it. I've seen other folks do it. You'll survive. I promise. I do recommend being over-generous with stitch markers if you feel like you're going to move stitches all around on your needles. Mark the instep sts and the heel stitches where you can so that if the cable of your needle gets pulled through in the wrong spot you won't panic and throw your knitting down in disgust. By no means are stitch markers required but if this is your first crack at 2aat cuff-down socks, it might be advantageous. 


 So once your stitches from the gusset are all decreased and you have a beautiful little triangle of gusset stitches on either side of your socks, you're ready to keep going with the Foot chart. The foot will be comprised of the Instep stitches (these are the stitches on the Front needle that make up the top of the foot and house all the design) and the Sole stitches, which are the stockinette stitches (knit all sts, all rounds) that will hide under your feet. It's a lot like working the leg except you don't have to worry about any design on the bottom. It's so fast!

Alrighty - I think that about wraps up the tips and tricks for this weeks' clue. Remember to keep posting and sharing your photos on social media. I love seeing them pop up. 

How, you ask?

Join our group on Ravelry: http://www.ravelry.com/groups/the-unapologetic-knitterTag me on Instagram: http://instagram.com/socalmeaghan and use #fallingdownmkal, #unapologeticknitter and/or #tuksockmkal.

And by all means, if you have questions, email me at meaghan@unapologeticknitter.com or message me on Rav (http://www.ravelry.com/people/SoCalMeaghan), leave a comment here, or leave questions in the Discussion board for the MKAL on Ravelry (http://www.ravelry.com/discuss/the-unapologetic-knitter/3013583/1-25#23). 

**NOTE**

There have been issues with me seeing questions on Ravelry in the past because, despite me being the owner of the discussion board, I don't get notified when people comment; I'm only notified if I'm tagged. So,  if it's urgent, please be sure to ear burn me. 

To do this enter my username in square brackets and follow it by tying the word "person" in parentheses: 
[socalmeaghan](person)

Lastly, a friendly reminder about our prizes. To be entered to win one of our fabulous prizes, please submit your photos to me via email, Instagram (being sure to tag @socalmeaghan) or in our Ravelry MKAL discussion NO LATER than 11:59pm PST on Thursday, October 30th.


Happy Knitting!!!

Wednesday, October 1, 2014

New Pattern: No Tricks All Treats Socks

Oh man, how long has it been since I've published a new pattern? It feels like forever (though it's only been a few months).

"Why?", you ask.

Because I've been a busy bee knitting up samples for magazines (yeah baby, I'm gonna be PUBLISHED), designing for Ewe Ewe Yarns, and generally keeping my fingers busy with lots and lots of knitting, but no new designs. Until now! With any luck, October will be a banner month and I'll get some "me" knitting done with some new designs out the door.

Today is the first step in achieving this - and what better a day to release it than the first of the month? And the first of the BEST month: October! Halloween is just around the corner and (in theory) the weather is cooling down so I can wear all the knits (though not so much here in SoCal... the Santa Ana's have arrived and its' gonna be hot, hot, HOT!).

But despite that, I wanted to share my latest creation with you: the No Tricks All Treats Socks. I absolutely love these babies. They're fun and colorful and LOOK super complicated but they're really not.

Featuring Nomadic Yarns in two colorways: "Smoke" as the base color and "The Slutty Pumpkin" both in the Trusty Sock base (75% Merino superwash, 25% nylon, 463 yds/100g) these socks show off some very  basic colorwork with sideways chevrons and a short row heel. LOOOOOOOOOVE!

I'd also like to give a major shout-out to Sheila (@knittysheshe on Instagram) who knit these lovely socks up and provided these awesome pictures. I wouldn't have made my October 1st deadline without her.

So, introducing... the No Tricks All Treats Socks!


And how about one more Treat to go with these socks? There's going to be a matching pattern released in the next two weeks that will be available for 50% off for the month of October with the purchase of these socks. Huzzah! 

Get these babies while they're hot! I can't wait to knit up my own pair so that my feet feel super Halloween-y. Hallo-weenie?! LOL. I kill me.

Knit 'em. Love 'em. Happy knitting, lovelies!