Monday, May 26, 2014

New Pattern: The Joyce

Being a relatively new knitwear designer, each pattern that's published is a thrill. I still get nervous uploading the pattern to Ravelry. Every. Time. What if people don't like it? What if there's errors (despite testing it and having it proof read)? What if, what if, what if?

But with today's release, I'm over the moon. I've had this pattern in my head for about 6 months but couldn't find the right fiber for the hat. I wanted something that would show stitch definition, something that was bright, but not tonal. And when I saw "Tomayto, Tomahto" by The Flying Kettle, I knew I had to make the hat in this yarn. It's fun and punchy, with lots of bright colors, but still shows the pattern well. And I'm in love with this hat.

And between now and June 18th (my 6th wedding anniversary!!!) if you purchase "Tomayto, Tomahto" from Joyce over at The Flying Kettle, you'll receive a discount code for 10% off the pattern. I hope you'll knit up this lovely hat and love it as much as I do. It's a nice quick knit, perfect for a weekend out on the back patio with a cuppa or a glass of your favorite wine!

Introducing...

The Joyce


Thursday, May 22, 2014

Turn It Up To 11 - MKAL - Week 4

OMG - you guys!!!! I'm so sad this is coming to an end. It has been an absolute blast knitting with you, watching your progress and seeing your "AHA!" moments when things clicked. I. Heart. You!

But! Here we are, at the end of our sock journey, though hopefully not at the end of our knitting friendship. And it's time to wrap things up, rock those socks and win some prizes. Because I LOVE giving away prizes! Let's wrap up the business end of stuff and then get to a the party business. Wait... is this the mullet part of sock knitting?! Am I flying this crazy plane all by myself? Alrighty then!

So we're folding our socks. I know, its kind of weird and totally un-mathematical (non-mathematical... someone correct my grammar here) but it works. It just does. So we've got our socks folded from the heels...


If your socks are LESS than or equal to 1-1/2" short of your toe, then it's time to start your ribbing. If NOT... you'll wanna keep knitting until your 0" disappears under your needle when the 1-1/2" mark is aligned with your toe. 

And once your get there, feel sad, because you can't knit any more of the pattern. I have such short feet that I only got to row 103 before I had to start my ribbing so I didn't get much of a pattern repeat. Boo! But I still love them and can't wait to wear them. 

See... they're even when folded in half!


So I ribbed, I bound off, and now it's time to soak and block the socks. We're going to employ the same blocking technique that we used in the swatching exercise. Get that wool wash out. I'm using a new scent since I ran out of my last one washing socks last week. This time I have Soak's "Yuzu" scent in my favorite sunflower blocking bowl (which is only good for one hat or one pair of socks, really). But its kind of lovely!


I'm gonna submerge these puppies for 15 minutes, or so, to let the fibers get saturated. Them I'm going to squash them out. You read that right - squash. We want to push everything together as tight as we can without wringing or twisting to get as much water out so we can then lay them down to dry.


Again, like with your swatch, we want to use the same technique for drying. I, for example, squashed the water out and then just plopped them down on a blocking mat. If you used a sock blocker when you did your swatch, use a sock blocker now, to get the same gauge. I tend to just nudge them into the shape I like and let 'em go. Then when I pull them on they feel oooooooohhhhhhh sooooooooo goooooood! Like my feet are wearing puppies. 

Wait... no. That's gross. Like they're wearing clouds. Let's go with that. Soft. Warm. And SPOILED! 'Cuz for serious... how spoiled are feet that wear handmade socks? RIDICULOUSLY spoiled. Maybe, dare I say, "Turn It Up To 11" spoiled? Too far? Ok... too far. Can't blame a girl for trying.

Anyway, now the socks are dry. And I tried to photograph them. Which was hard because I didn't want to stand in my white box of photography since I think they look better in their natural surroundings (read: on my dog-covered floors and rugs). So I tried. And I think they look pretty darn good.


And now to the reason we're all here - the PRIZES! Did you forget there were prizes? I know some folks have so let's review what's up for grabs, shall we?

  • A skein of yarn from Black Market Wool (and since its a MYSTERY KAL, it'll be a mystery as to what the skein looks like, but trust me, is awesome)
  • A small project bag from my local peep, Sarahinajar (amazeballs!)
  • A free pattern of your choice from ME!!! You can choose from any of my patterns or from the patterns I have with Ewe Ewe Yarns and I'll buy it for you (since they're now not technically mine to give away). Or you can hold on to your credit for a free pattern and claim it when you see something of mine you like. Whatever makes you happy!

And how do you win said prizes? Welp, firstly, you have to FINISH the socks. Only finished socks are eligible for prizes, but don't panic, they're not due just yet. I, lucky duck that I am, am headed to Scotland for two weeks on May 30th. I'll pretty much be on an internet black out except those few times we get some Wi-Fi so I'm giving you until June 18th (my 6th wedding annivesary, as it happens) to finish your socks and submit images.

Secondly, you send me pictures. Oodles and oodles of pictures! Ok, don't overload me, but  you know... send me pictures. The best way to do this is on Instagram. Tag me (@socalmeaghan) and use the following hashtags so I can find them: #tuksockmkal #turnitupto11mkal #unapologeticknitter. Or post your finished socks in our HO's and FO's board on Ravelry or if you're not into that, you can just email me at meaghan@unapologeticknitter.com with the subject "Finished MKAL Socks".

Th-th-th-that's all folks. Thank you, from the bottom of my heart, for taking the time and putting your trust in me, to learn how to make socks. It's been a blast from my end of things and I hope you've had fun too. I know math is rarely something that makes people excited but I think you can see the beauty of it when applied to knitting. Have fun knitting. I hope you'll knit oodles and oodles of socks. And always feel free to contact me with questions about socks (mine or any others you try). 

Happy Knitting, my sock-knitting ninja lovelies!!!


ML4L!

Friday, May 16, 2014

Turn It Up To 11 - MKAL - Week 3

Good morning lovely Knit Along-ers. I hope your knitting went well yesterday and that you're not too upset at me for not posting this yesterday. Rest assured that any disappointment you feel in me for not posting I feel a thousand-fold. I slept quite poorly last night as I was up drafting this post in my head wondering how much to share, how to share it, whether to share it at all. So, I've decided I WILL share since I've pretty much fallen in love with the Instagram and Ravelry community I've had the good fortune to meet and get to know.

So, before we get to the socks, here's the dealio.

As many of you saw on Wednesday, I was evacuated because of the fires. Wednesday is the day I make all the final tweaks to the pattern, make sure there aren't any glaring errors (albeit a few sneak past and I always hate that), and the day I photograph my socks for the blog and write the blog post. So, Wednesdays, as you might guess, are integral in the MKAL process. Being evacuated put a huge kink in that. So I woke up at 5am on Thursday morning to get the final tidbits done and posted to you all. I hate that it was late as I know so many of you on the East coast are up hours before I am and love getting the pattern. I appreciate all of your kind words and concern.

And then yesterday happened. And here's where the over-share may come in. If knowing personal things about me ins't a priority then please feel free to skip this part but I feel awful about not posting yesterday but I feel like it was necessary for me not to. It would not have been a happy post. And all I want is for you to have a good time knitting, and if possible, a good time reading my blog, too.

**SKIP THIS SECTION IF YOU DON'T WANT TO KNOW**

Back in 2008 I was diagnosed with Thyroid cancer. We did the surgery. Got it out. Did a round of radiation and everything was good. Is good, I should say. There was a scare in 2011 when the docs got a false positive (thank God) but otherwise things have been pretty darn good.

Last year I found a lump in my breast. Naturally, the doctor took all the precautionary steps and sent me for a mammogram and ultrasound. The GOOD news was I was told, categorically, that I'm still young and it's just dense tissue. The bad news is that I had to spend an entire day with my boobs out. By no means am I suggesting that I'm the only person this happens to. Far from it, and my situation is far from the worst of what happens. My goodness - I'm LUCKY I have a doctor who cares, and the insurance to cover it. I'm just an exceedingly private person physically and situations like that make me want to curl up in a ball and hide from everyone. Also, I realize that I'm not the only one who feels this way. No one I know is like "YAY! Today I get to get my boobs smashed into machine, and fondled by a perfect stranger". No, I know no one feels that way. I just know I react very badly to it and get uber negative and sad and exhausted.

SO - yesterday when I went in for my annual check up there were a few more issues and so, once again, a day I had hoped would be dedicated to you guys after a short visit to the docs, turned into a very long ordeal that left me starving, emotional and exhausted. So the thought of coming home and trying to stay positive while I helped all of you, my favorite peeps, with your knitting questions, kind of broke me. So I collapsed into my knitting chair, did some joy-knitting (a Sockhead, which I now realize I did wrong since I did 1x1 rib instead of 2x2 but I'll deal... I'm not ripping out 4" of rib on size 2's) and drank a few cocktails to take the edge off.

But now I'm back. And I hope you haven't abandoned me, disappointed in my lack of commitment to my promise to write the blog post yesterday. The long and the short of it, the docs found a small cyst but it's nothing they're worried about. They want me to keep an eye on it and despite being under 40 years old, I'm going to have to do annual mammograms (yay.... NOT!) but otherwise, things are good.

Now that the drama is out of the way and I feel like I've just unloaded on your all (please forgive me) I'd like to get on to the sock business since that's what we're here for, right? Ok. Let's shall.

**END OF PERSONAL SECTION - back to the good stuff**

Ok, so to the heels, to the heels. I love the heels. And hate them all at the same time. I'm not sure I have yet to discover "the perfect" heel as I think changing directions in knitting, like the direction change needed to make a heel, is something that will be a challenge forever in knitting.

Why do you love and hate, you ask? Because I LOVE the look of short row heels, and they feel like they knit up quickly and let's be honest, who doesn't want a heel to knit up quickly? We want to get back to patterns which are rarely on heels, but I HATE that they almost always have awkward gaps or tension issues. Even the Ribbon Heel, which I love, still feels like it's not "perfect". It feels fussy with the pick ups. I don't think it's as bad as a standard short row heel, but it still feels fussy sometimes.

And what about the Fleegle? Yes, I love it, also, as I think it has simple steps and produces a very nice looking, comfortable heel, but it feels like it takes forever to knit and I think it's awkward having so many stitches on the back needle compared to the front. I work it on patterns where the fabric we create with the stitches isn't as flexible (a lot of cables, for example) but it's not my go-to for sure.

But I had to choose some heel options for you - I couldn't just say "Go find a heel, suckers, and figure it out yourself!" now could I? No, I couldn't. So I chose two heels that I could walk you through and hopefully help you find success and satisfaction.

For my sock, I decided to go with The Ribbon Heel since I think it's trickier for folks to sort out with the pick ups. I've had mixed reactions, not only from you folks, but from folks who have done test knits of it in the past. Some people LOVE it and have started to use it instead of any other short row heel (and that makes my heart sing) others are take it or leave it. And I'm ok with that. I know the Fish Lips Kiss heel is very popular. It's on my "to try" list, but as I haven't done it yet I can't really speak to it.

I think I'm digressing here. Short row heels, like the Ribbon Heel, are called "Short Row" heels because each time we turn the work, we work a shorter row of stitches because we leave one more stitch "unworked" (i.e.: not knit or purled). In 2aat sock construction, short row heels are worked one at a time. Could we work the heels simultaneously? Sure. I suppose we could. We'd still be working back and forth across the back needles only so there would be no working on the front of the needles, but it's just standard practice to finish one heel before moving on to the next. I feel more accomplished finishing one first, also. PLUS! (and this just came to me) what if you made a mistake somewhere... it would be better to rip back only one heel rather than both.

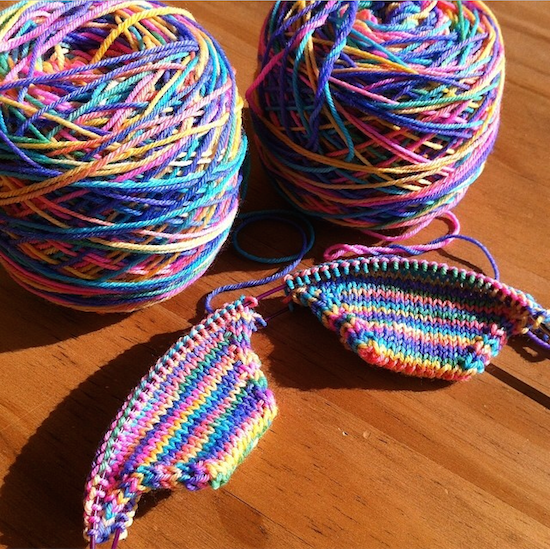
Ok, I'm digressing yet again. Here's my first heel finished:

From the bottom

From the top

Of course when I say "finished" I suppose I mean "95% finished" because we do have one unworked stitch left on the right hand side. You might be wondering why... and I'm happy to say that I have an answer for that! If we worked back across on the WRONG side of the work to pick up and knit that remaining unworked stitch we would then have to work BACK across on the right side row in order to get to the point where we want to turn our socks around and knit across the front of the sock. By doing that, though, we're creating an extra row, effectively making the back row of the sock a row taller than the front. When this happens, we get a gap between our front and back rows, and end up with a hole in our sock. SUPER annoying. Is the sock less wearable? Not at all. I have socks with this little hole (because I learned this trick after I started my Vanilla sock marathon earlier this year). Do those little holes plague me and make me want to re-knit the socks? Wellllll... maybe a little because I'm an uber-perfectionist like many knitters are, but I deal. There will be more socks, more lovely yarn and more important things to worry about than a tiny hole. When things like that get to me, I remember a saying I heard from Kate Atherley: If a man riding by on a horse can't see the error, it's not worth worrying about. I daresay if a knight in shining armor WAS riding by on said horse and thought to say something asinine about my hand-knit socks, he'd probably get stabbed with my size 2's!

I will say this, if you're still working on your Ribbon Heel heels... the tension when purling back across the row on the wrong side, when you're slipping that first stitch, is KEY. I have days when I've had a cocktail or three, and I sit down to do heels... no bueno. I end up ripping them back the next day because I was too relaxed and my first stitch on the wrong side isn't tight enough and I end up with floopy heels. Yes, floopy. Makes me made. So that's my big tip - keep that first purl stitch after slipping your first stitch, nice and snug to get a cleaner looking heel.

If I had  knit a standard toe rather than an anatomical toe, as many of you have, you'll find your heels and your toes look almost identical. 

So my heels are done and I'm ready to move up the calf in pattern. But before I get to that, let's briefly discuss the Fleegel Heel. The genius of the Fleegle Heel is that it looks like a gusset, but it's worked from the toe up (or top down, both ways work the same) but it doesn't require any pick ups like a standard top-down gusset does. It's pretty amazing. However, with the way that we do create the stitches that will wrap around our heels, we create a longer heel because it takes so many more rows to get to the full number of stitches required. I do find myself doing a lot of shuffling of stitches to get my ends to meet up as the number of stitches increases on the back. If you're knitting the Fleegle heel you'll know what I'm talking about. The potential for laddering is a bit higher with this type of heel but I still think its a great solution for high arched feet. 

I did see a comment in our Ravelry discussion board about working extra stitches in a short row heel to accommodate for a higher arch. I'm not familiar with this technique so I can't speak to its effectiveness BUT I'm going to look into it because I'd love to find a short row solution for folks with high arches. 

Alright, so to the calves. I've given you the option of working the pattern up the front AND the back, or just working up the front. I think both will look awesome. I will be knitting up the front and back - after working so much stockinette on the sole of the sock I want a bit more of a challenge. The combination of stitches we have here shouldn't make your fabric too tight so if you're worried about it working up your calves and being too tight, you should be just fine!

Thanks for tuning in today (a day late). I want to say thanks again for choosing to knit with me. I'm having a blast and am now off to respond to all the questions on Ravelry. I won't let you down again with the timing. Thank you for your kind words and concerns on Wednesday. We're safe, sound, and happy (if not a bit smokey).

Happy Knitting!

Thursday, May 8, 2014

Turn It Up To 11 - MKAL - Week 2

Ok, was that THE LONGEST WEEK EVER waiting for this second clue to come out? Right?! I know how many of you were excited to move forward and I'm so pleased you guys had fun. Trust me when I say I was as anxious as you were to move forward but I did promise a schedule and some lovelies didn't get their toes done until just yesterday so I feel less bad now.

Can we just look at some of the TOOOOOOOOOOOE NUBBINNNNNNNNNNNS from this past week? OMG! They're looking totes amazeballs! I've pulled a few from Instagram...


(using our MKAL Kit colorway "Sentimental Heart" from Black Market Wool)

(also using our MKAL Kit colorway "Tweeter and the Monkeyman" from Black Market Wool)


(a FIRST TIME sock knitter)


THE COLORS!  I am so excited to see what happens this week now that we've got a pattern to introduce to these yarns. I die!

Now, there were a few typo's in last weeks clue release and I apologize for that. It seems that a few folks found them right away and let me know (THANKS ladies) and I hope you weren't too frustrated with the second release just hours after the first. I was uber embarrassed but that's life right? Every pattern has to have a small error somewhere. Let's hope that was it, shall we?!

So now your toes are done and you're ready to get on to the instep. Let's DO this thing! And it's gonna be a chart! I know, I know, some people are better with written patterns but when it comes to something like this, with custom sizing, written instructions just don't work. I have done my best to make the chart as legible as possible. With that said, if you need larger charts let me know and I'll split it on to two pages. I figured many people would view it on a computer screen or an iPad and can zoom in, but I did see that some of you printed out hard copies. PLEASE DON'T BE SHY! Tell me what you need and I'll provide it happily!

Ok, so with the chart - I can already hear at least one person furiously typing me a text message saying "I hate you... starting rows with a purl stitch... dammit WOMAN!". Seriously, that's exactly what it'll say. Allow me to say this, then: if you don't WANT to start a row with a purl stitch, then don't! That's the beauty of a custom sock. You can do whatever you want to do with it.

IF you decide (and yes, that's supposed to be all caps, not a typo) to start each row with a knit stitch, and that's totally ok, you'll simply end up with a vertical line of stitches separating the front of your sock design from the back of your sock design. And that's A-OK in my books. Many folks who haven't yet sorted out their tension, and end up with ladders, will do this as purl stitches at the beginning of a row can look sloppy.

!!!!! Let me say: it's not a lack of ability in a knitter if there are ladders. It's simply something that everyone has to learn the trick of. Please don't get discouraged if you have a few ladders. Most will come out with blocking and wearing!!!!!!

However, with regards to starting a row with purl stitches: I think if you use the handy-dandy little trick in the pattern about purling with a backward wrap (i.e.: clockwise instead of counter-clockwise) that you'll find your tension is pretty darn good. It seems to have eliminated most of my issues.

I bet you're wondering WHY I've had you work rows that start with purl stitches if this is a teaching MKAL... because I can! Mwa ha ha ha!

Ok, for serious, though, because I want you to see that knit stitches and purl stitches worked in a variety of combinations won't affect your gauge and will allow you to continue to knit socks that fit. Some things do affect gauge, of course, like cables, YO's, dropped stitches, etc. but many combinations won't.

I want to encourage you all to start looking at patterns through new eyes: eyes that have seen YOU make socks that fit rather than just blindly following a pattern and ending up with socks that don't fit. Uh... been there. Done that. So over it. So now you'll be able to see how patterns work up, adjust for YOUR foot and always get socks that fit.

*stepping off my soap box*

Back to the program? Yes, let's shall.

So now you've got 60 rows of charted pattern to work on your socks. REMEMBER! You're knitting this pattern on the front of the socks ONLY! The back of the socks, which will be the soles of your socks, will be worked in stockinette (knitting every row). Please remember to stop your sock 2" short of the desired total length. We'll get into why next week.

Also! If you get to the end of the chart and still need more pattern to reach your desired length minus 2", patience grasshopper: next week will have more chart to work and details on the heels.

As always, if you have questions or are just downright lost (but hopefully not frustrated because I want you to love these socks) please ask questions here on the blog, on Ravelry in our discussion group (or private message me, I'm SoCalMeaghan), and of course you can come harass me on Instagram where I'm also @socalmeaghan.

If you're posting on InstagramFacebook or Twitter please use #unapologeticknitter, #tuksockmkal and/or #turnitupto11mkal so I can find you and see all your fabulous work. I'm so excited to be knitting with you all and look forward to seeing your toe nubbins crop up on social media!
Happy Knitting, lovelies!!!

Thursday, May 1, 2014

Turn It Up To 11 - MKAL - Week 1

Hello my lovely knitting friends. I hope you had a good time knitting up your gauge swatch... if that's possible. I know a lot of people hate them and see it as a waste of time and yarn but if it means an expensive project (either financially or time-wise) will fit it, seems worth it to me in the end.

Ok, so the toes! It finally feels like the MKAL has OFFICIALLY started now that we're actually casting on and doing some legit knitting. I couldn't wait to cast on and it makes my heart happy to see how excited you all are in the Ravelry discussion board. Seeing your yarn choices... EEEE! So fun!

So I chose to do an anatomical toe for my socks. I don't do this if I have vanilla socks since I then have to pick them up and check which way the toe is going before I put them on but, as a sneaky-peaky into the upcoming pattern, what I WILL tell you is that the pattern is somewhat directional, and mirrored on each sock, so that if you DO decide to do the anatomical toe, you'll easily be able to tell which sock is made for each foot.

If you haven't chosen which toe to do yet then here's a bit more information about the Anatomical Toe vs. the Standard Toe: the anatomical toe is longer (i.e.: it takes more rows to do your increases from your cast-on to your desired count of stitches).

Why is that? Because you're not increasing 2 stitches every increase round, you increase 2 stitches on the first increase round and then only 1 stitch on the next increase round.

Compare that to the Standard Toe where you are increasing 2 stitches EVERY increase round.

Well... now that I type this up I realize I'm thinking of only the front stitches. On every increase round for the Standard Toe you actually increase 4 stitches... are you confused yet?

Let's go back and look at this with a bit more clarity: The Anatomical Toes will increase a TOTAL of 6 stitches over 4 rounds whereas the Standard Toe will increase a TOTAL of 8 stitches over 4 rounds. I'm going to go into the math of it all here so you may either want to go get a cup of coffee so you can stimulate your mind and stay awake for this math, or, you may want to skip the next two paragraphs. Either way, you've been warned.

*WARNING... WARNING*
If you're not a math person or don't really care how it all works out, don't read this next section.

I'm going to use my sock numbers as an example. Obviously you would want to use your own numbers for this section.

As a reminder: I cast on 24 sts (12 sts on the front needle and 12 sts on the back needle) and am increasing to a total of 56 stitches (28 sts on the front needle and 28 sts on the back needle).

If I subtract 24 from 56 I get 32 stitches. So to complete my toe shaping I have to increase by 32 sts (16 on the front needle and 16 on the back needle). For a standard toe, I can divide 32 by 4 (since we increase 4 stitches on EACH increase row) and I get 8. We also have to factor in that, between each increase round, we have an all-knit round so we can double 8 to accommodate these knit rows. All said and done, it will take 16 rounds to increase for the toe. If I look at my row gauge, which was 42.5 sts over 4", that means my toe will be 1.5" tall (deep? long? how would you measure that distance?).

Now, compare that to an Anatomical Toe. The same math applies... kinda, sorta!

I still need to increase 32 stitches but we work our increases in 6's rather than 4's. If I divide 32 by 6 I don't get an even number; it's 5.33333 ad nauseum. So, I'll multiply 5 (since we want to round down to the nearest whole number) by 6 increased stitches and get 30 which leaves me 2 stitches short. And per the *Note* section in the pattern release for this week below the Anatomical Toe instructions, I'll work one more repeat of rounds 3 and 4 to increase those 2 extra stitches.

BUT! Those 32 stitch increases are worked over multiples of 4 Rounds rather than multiples of 2 Rounds. So 5 multiplied by 4 rows is 20 rows. Plus two more rows for the extra increases is 2 for a total of 22 rounds to reach my final stitch count of 56 stitches. 22 rounds is 2.07".

I realize it's a marginal difference, but if you want your pattern to start half an inch shorter, work the Standard Toe (even though the Anatomical Toe looks way cooler, IMO)!

Ok, back to the land of non-glazed over eyes.

The long and the short of it is that there's tons of math that CAN be done, or you can just knit along without worrying about the math and just enjoy the process.

But by the end of this week you'll have what I lovingly refer to as Toe Nubbins. However... there's a caveat. If you're ALSO going to call them that when you say "Toe Nubbins" in your head you have to say it like "TOOOOOOOOOOOE NUBBINNNNNNNNNS" - and kind of sing it. It makes everything better.

So, here are my TOOOOOOOOOOOE NUBBINNNNNNNNNS:


If you look REALLY closely you can see the increases on the left side of the toe in this bottom picture are every 4 rows rather than every other so theres some subtle toe shaping for the Anatomical Toe.

Ok, I'm not sure what else to write about this week's work. I think I've fired enough math at you for one week. There's just a TINY bit more next week but mostly it's all fun and knitting games. 

As always, if you have questions or are just downright lost (but hopefully not frustrated because I want you to love these socks) please ask questions here on the blog, on Raverly in our discussion group (or private message me, I'm SoCalMeaghan), and of course you can come harass me on Instagram where I'm also @socalmeaghan.

If you're posting on Instagram, Facebook or Twitter please use #unapologeticknitter, #tuksockmkal and/or #turnitupto11mkal so I can find you and see all your fabulous work. I'm so excited to be knitting with you all and look forward to seeing your toe nubbins crop up on social media!

Happy Knitting, lovelies!!!